TDD 重點回顧:
先寫測試再開發。
依循「紅燈/綠燈/重構」循環(Red/Green/Refactor)。
優點是在初期就確保測試程式的撰寫,而且更容易在初期定義出更貼近使用方的介面。
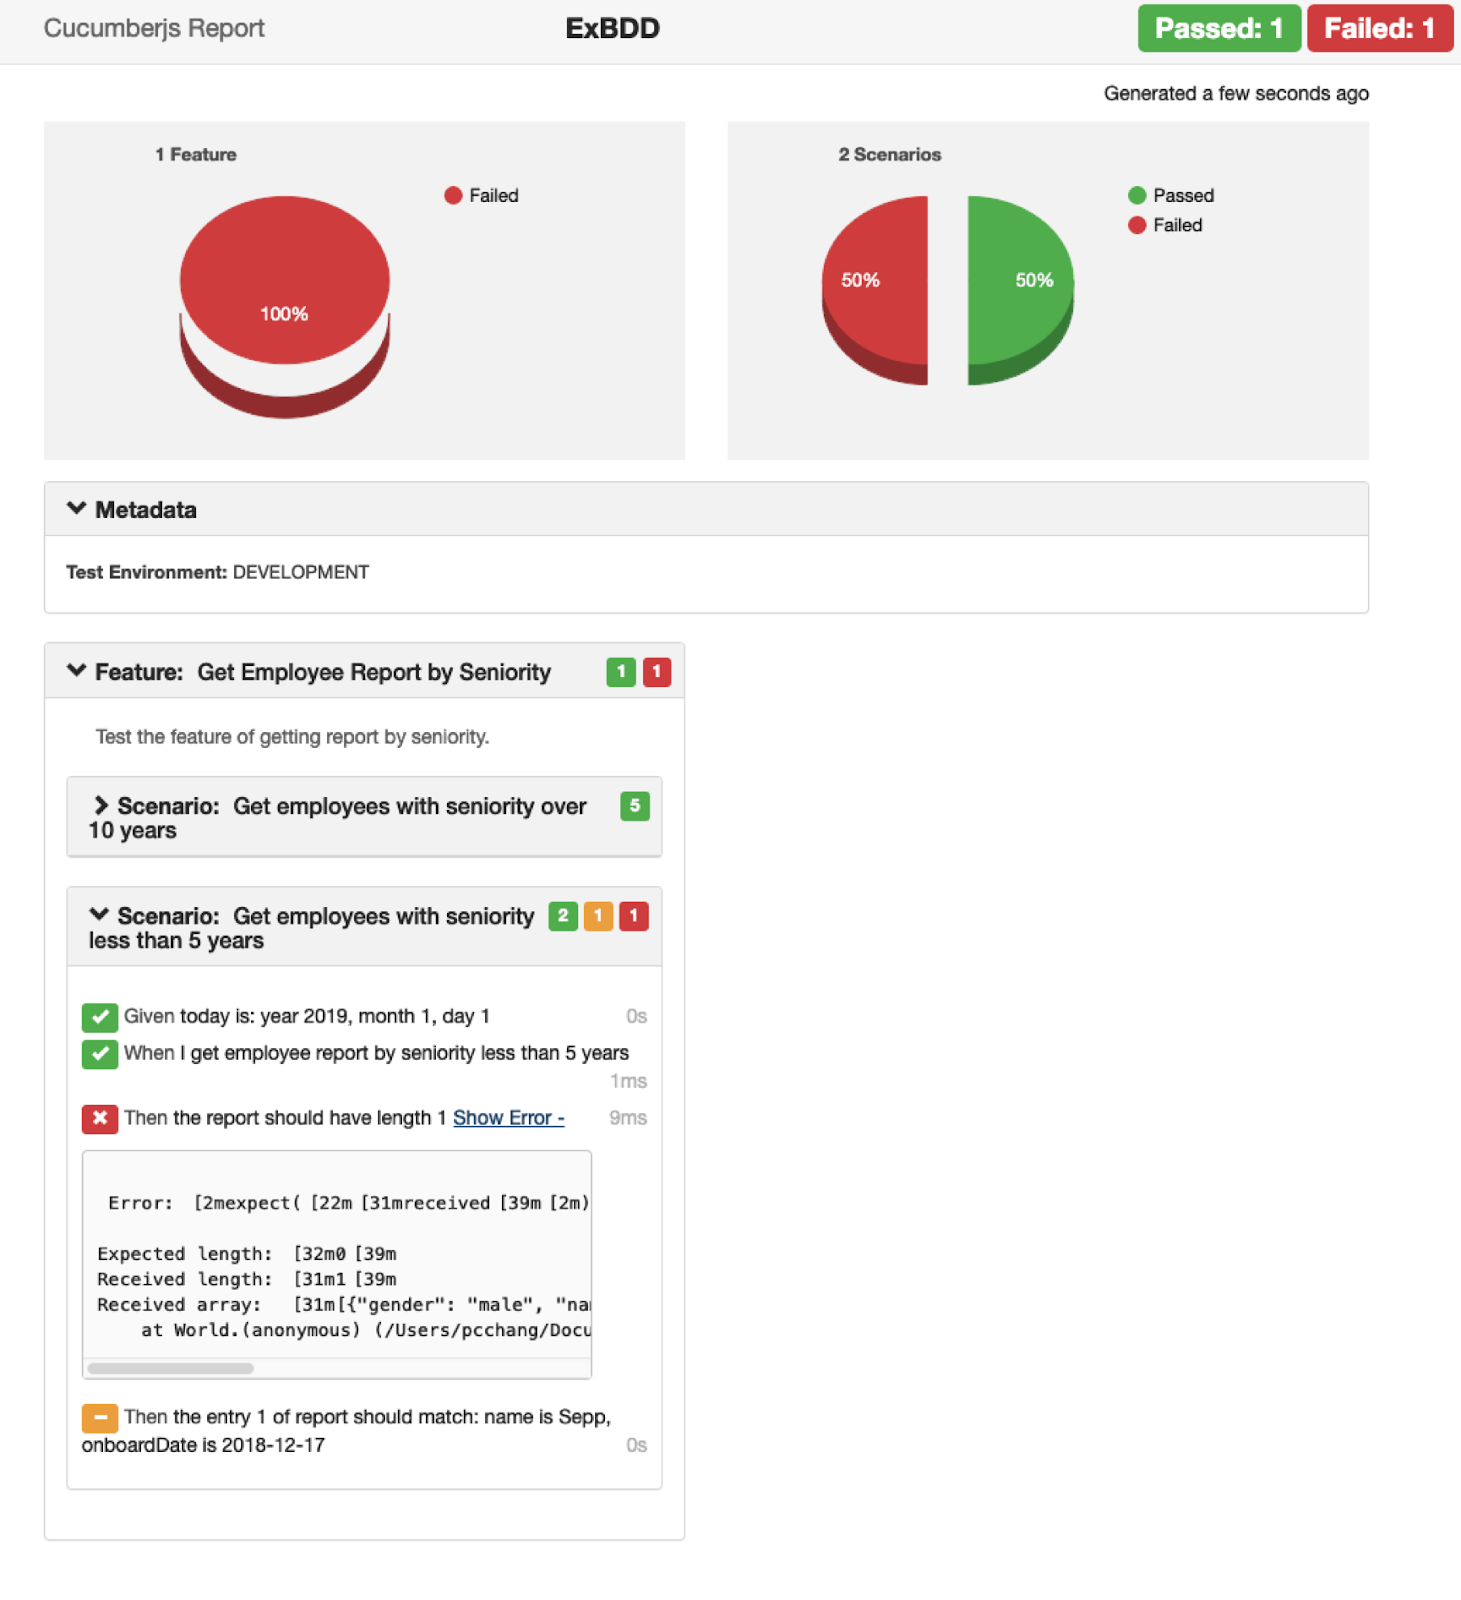
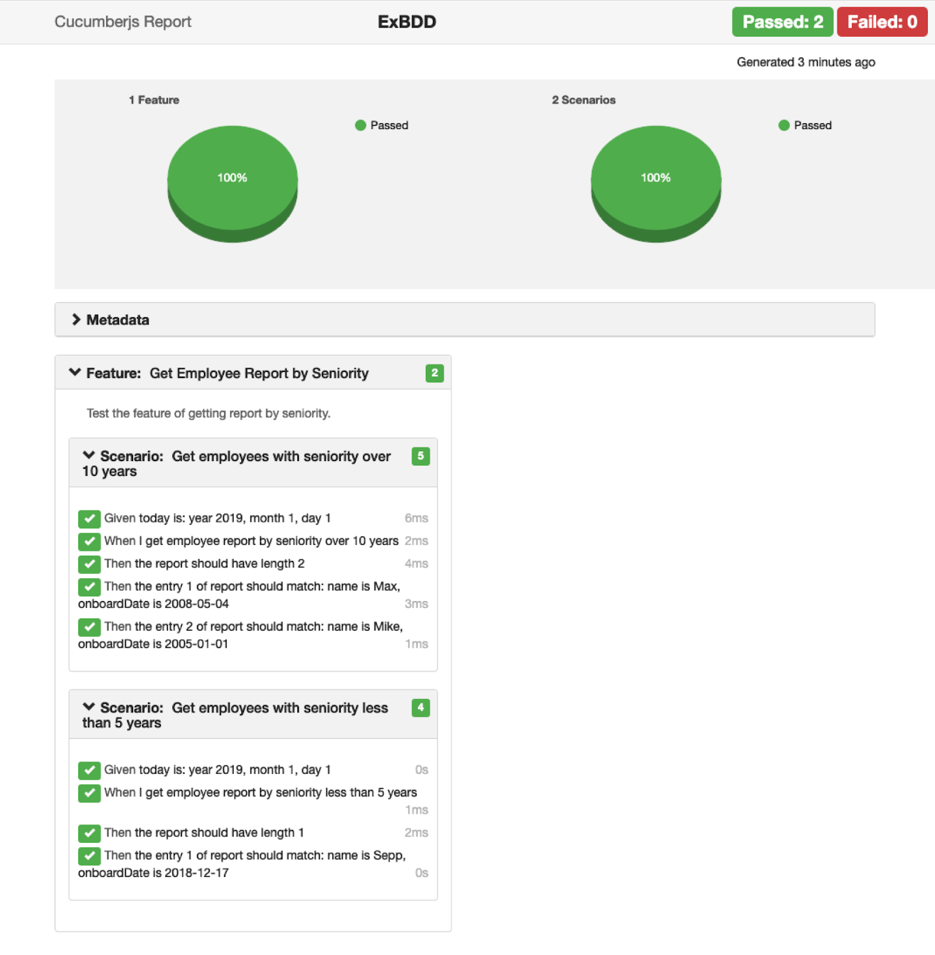
但 TDD 所撰寫出來的測試案例是一連串程式碼,過於偏重技術人員,不利與其他非技術的專案參與者討論,例如 PM (Product Manager) 或 PO (Product Owner)。此外,也不利產生一份如下圖這樣一目瞭然、容易閱讀的測試報告:
本篇將介紹 BDD (Behaviour-Driven Development) 如何補足這一哩路的不足,並延續上篇文章的範例來示範如何實戰 BDD。
TDD 的不足 —— 非技術人員難以參與討論
還記得上篇文章的範例,我們示範了一個「員工報表管理系統」的範例,而且在步驟一透過使用者角度思考,在開發前就定義出更好的 API 介面 嗎?
除了需求書表面要求的「撈出十年資深員工」功能,在使用者角度延伸思考到未來可能會有「撈出五年內的資淺員工」的需求,因而在開發前就定義出彈性更大的 API 介面,降低開始實作甚至產品上線後再回頭對 API 介面變動的風險。
「員工報表管理系統」是很簡單的範例,我們可以輕易判斷「撈出五年內的資淺員工」是個合理需求。但在現實專案中,當想到一個使用情境是需求規格書沒有定義到的,通常需要與 PM (Product Manager) 或 PO (Product Owner) 進行討論 ,確認是否符合產品走向。
想像一下,這時候如果企圖直接用以下測試案例當作討論素材,與 PM 或 PO 等非程式開發人員進行討論:
// file: src/test/emp-report.test.js const empReport = require ( '../main/emp-report' ) ; const expect = require ( 'expect' ) ; describe ( 'Get Report by Seniority' , ( ) => { it ( 'Get employees with seniority over 10 years' , ( ) => { let baseDate = new Date ( 2019 , 0 , 1 ) ; let ret = empReport . getReportBySeniority ( baseDate , 10 , false ) ; expect ( ret ) . toHaveLength ( 2 ) ; expect ( ret [ 0 ] ) . toMatchObject ( { name : 'Max' , onboardDate : '2008-05-04' } ) ; expect ( ret [ 1 ] ) . toMatchObject ( { name : 'Mike' , onboardDate : '2005-01-01' } ) ; } ) ; it ( 'Get employees with seniority less than 5 years' , ( ) => { let baseDate = new Date ( 2019 , 0 , 1 ) ; let ret = empReport . getReportBySeniority ( baseDate , 5 , true ) ; expect ( ret ) . toHaveLength ( 1 ) ; expect ( ret [ 0 ] ) . toMatchObject ( { name : 'Sepp' , onboardDate : '2018-12-17' } ) ; } ) ; } ) ;
可以想見這樣的素材太過偏重工程師背景,對 PM 來說很難進入狀況 。為了讓討論順利,工程師可能必須另外寫一份更易於理解的文件來描述情境,對工程師來說等於為同樣一件事花兩份功夫。
如果寫測試案例時就能寫得更接近人類可讀的規格 ,例如:
Feature : Get Employee Report by Seniority Test the feature of getting report by seniority. Scenario : Get employees with seniority over 10 years Given today is: year 2019, month 1, day 1When I get employee report by seniority over 10 yearsThen the report should have length 2Then the entry 1 of report should match: name is "Max" , onboardDate is "2008-05-04" Then the entry 2 of report should match: name is "Mike" , onboardDate is "2005-01-01" Scenario : Get employees with seniority less than 5 years Given today is: year 2019, month 1, day 1When I get employee report by seniority less than 5 yearsThen the report should have length 1Then the entry 1 of report should match: name is "Sepp" , onboardDate is "2018-12-17"
這兩份素材所描述的測試案例一模一樣 ,但後者類似規格書的形式,明顯人類可讀性好很多,即使非技術人員也能輕易理解內涵 ,以此為基礎建立討論。
而最重要的,這份規格書也要可以被自動化測試執行 ,甚至以此為基礎,產生一份一目瞭然的測試報告 。
該怎麼實現這些理想?就是本篇接下來要介紹的 BDD。
什麼是 BDD (Behaviour-Driven Development) ?
BDD 的重要精神在於能更有效地發現問題、方便協作和示範 (BDD is about discovery, collaboration and examples)。
在上篇文章我們已經學到,TDD 是實作前先寫測試。而 BDD 比 TDD 更進一步,在寫測試前先寫測試規格書。 這份測試規格會用更接近人類語意的自然語言來描述軟體功能和測試案例。 而且這份規格不是單純的敘述文件,而是一份「可以被執行的規格」 ,也就是可以被轉成自動化測試。
輔助 BDD 實作的工具套件很多,本文將以
Cucumber 這套工具作為示範。
BDD 工具 Cucumber
以下快速介紹幾項使用 Cucumber 必備的重點知識。
Cucumber 簡介
Cucumber 是一個支援 BDD 的工具,支援三個重要目的:
能描寫明確可執行的規格書 (Specification),具備人類語意可讀性,同時 Cucumber 也能解析。
能透過 Cucumber 進行自動化測試,驗證軟體是否符合規格書的描述。
能透過規格書,將軟體的功能行為文件化。
重要術語
Cucumber 在測試規格書有幾個重要術語,非常容易理解,分別是 Specification、Scenario、 Step ,他們的關係如下:
在 Cucumber 裡,每一個使用情境或測試案例稱為一個 Scenario。
每一個 Scenario 有很多個 Step 要進行。
多個功能相近的 Scenario 可以被寫在同一份 Specification 檔案裡。
在 Cucumber 裡,一個 Specification 檔也被稱為 feature 檔。
一個專案有各種不同的功能模組,可以把所有的 Scenario 分成多個 Specification 檔便於管理。
Cucumber 怎麼撰寫規格書
由於 Specification 檔必須是可執行的 (Executable),在 Cucumber 裡使用一個名叫 Gherkin 的語法結構來描述 :
Feature: 一句話簡介這份規格書所涵蓋的軟體功能 對這份規格書更多的介紹 (非必要,不影響自動測試) 介紹.... 介紹.... Scenario: 要測試的測試案例 1 Given 前提條件是.... When 我做了某件事.... Then 結果應該得到... Scenario: 要測試的測試案例 2 Given 前提條件是.... When 我做了某件事.... Then 結果應該得到...
上面結構裡,Scenario 底下每一行,無論開頭關鍵字是 Given、When、Then,都代表一個 要進行 Step。
Gherkin 的特色是
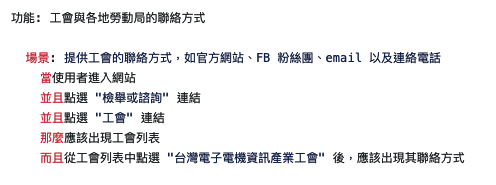
支援許多人類自然語言 ,團隊可以用自己喜歡的語言,例如英文、中文、日文、韓文等。以下就是一個繁體中文的例子:
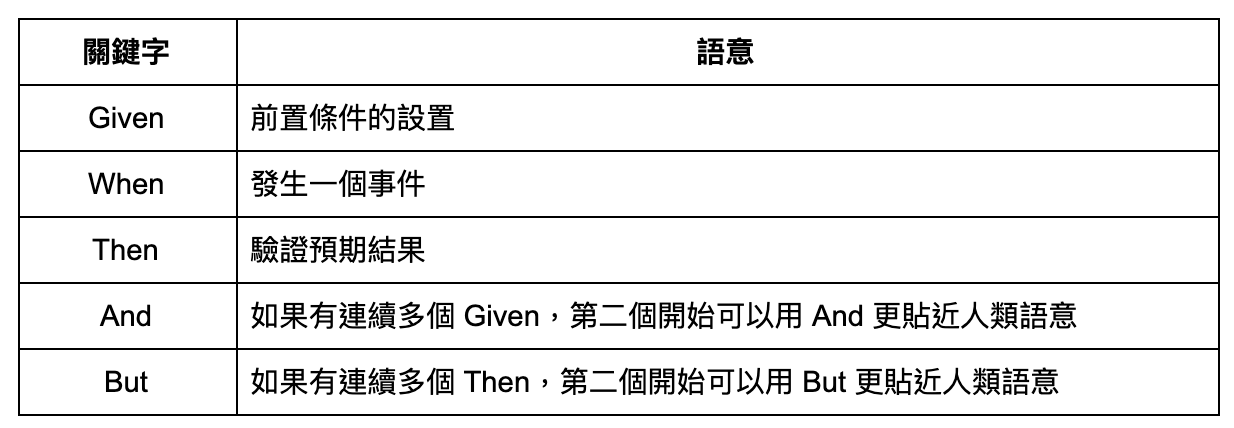
Step 開頭關鍵字
Gherkin 所撰寫的 Step,開頭都會帶一個關鍵字,便於理解這一個步驟的性質。
BDD 實戰示範
接著就透過實戰來了解 BDD 的實際操作。我們將遵照 TDD 的開發流程,先寫測試才開發,差別在於我們將透過 BDD 的方式來撰寫測試。
步驟 1:安裝 Cucumber 與設定
在 Node.js 裡,只需要透過 npm 就能輕易安裝:
$ npm install cucumber --save-dev
然後修改 package.json 的 script:
…. " scripts" " test" " cucumber-js src/test/features" }, …..
並在專案根目錄的地方新增以下檔案:
// file: cucumber.js module . exports = { default : `--format-options '{"snippetInterface": "synchronous"}'` }
步驟 2:撰寫第一個測試情境
就像 TDD 一開始是從測試案例切入,BDD 也是,不同的是 BDD 撰寫的是規格書。
我們新增一個 feature 檔,並加入第一個測試情境:
Feature : Get Employee Report by Seniority Test the feature of getting report by seniority. Scenario : Get employees with seniority over 10 years Given today is: year 2019, month 1, day 1When I get employee report by seniority over 10 yearsThen the report should have length 2Then the entry 1 of report should match: name is Max, onboardDate is 2008-05-04Then the entry 2 of report should match: name is Mike, onboardDate is 2005-01-01
步驟 3:實作 Step 定義
為了讓 Cucumber 能讀懂每一個 Step,我們必須定義每一個 Step 對應什麼動作內容。我們新增一個 js 檔專門定義每一個 Step 動作。
對應步驟 2 裡出現的 5 個 Step,我們新增了 5 個 Step 定義:
// file: src/test/features/step-definitions/emp-report-stepdefs.js const { Given, When, Then } = require ( 'cucumber' ) ; const expect = require ( 'expect' ) ; const empReport = require ( '../../src/main/emp-report' ) ; Given ( 'today is: year 2019, month 1, day 1' , function ( ) { this . baseDate = new Date ( 2019 , 0 , 1 ) ; } ) ; When ( 'I get employee report by seniority over 10 years' , function ( ) { this . result = empReport . getReportBySeniority ( this . baseDate , 10 , false ) ; } ) ; Then ( 'the report should have length 2' , function ( ) { expect ( this . result ) . toHaveLength ( 2 ) ; } ) ; Then ( 'the entry 1 of report should match: name is Max, onboardDate is 2008-05-04' , function ( ) { expect ( this . result [ 0 ] ) . toMatchObject ( { name : 'Max' , onboardDate : '2008-05-04' } ) ; } ) ; Then ( 'the entry 2 of report should match: name is Mike, onboardDate is 2005-01-01' , function ( ) { expect ( this . result [ 1 ] ) . toMatchObject ( { name : 'Mike' , onboardDate : '2005-01-01' } ) ; } ) ;
記得,我們遵循的仍舊是先寫測試再開發的流程,代表這個階段我們還沒實作 API 功能,只決定了介面:
// file: src/main/emp-report.js const employees = [ { name : 'Max' , onboardDate : '2008-05-04' , gender : 'male' } , { name : 'Sepp' , onboardDate : '2018-12-17' , gender : 'male' } , { name : 'Nina' , onboardDate : '2010-07-09' , gender : 'female' } , { name : 'Mike' , onboardDate : '2005-01-01' , gender : 'male' } , ] ; const getReportBySeniority = ( baseDate , year , isLessThan ) => { // TODO return null; } module . exports = { getReportBySeniority } ;
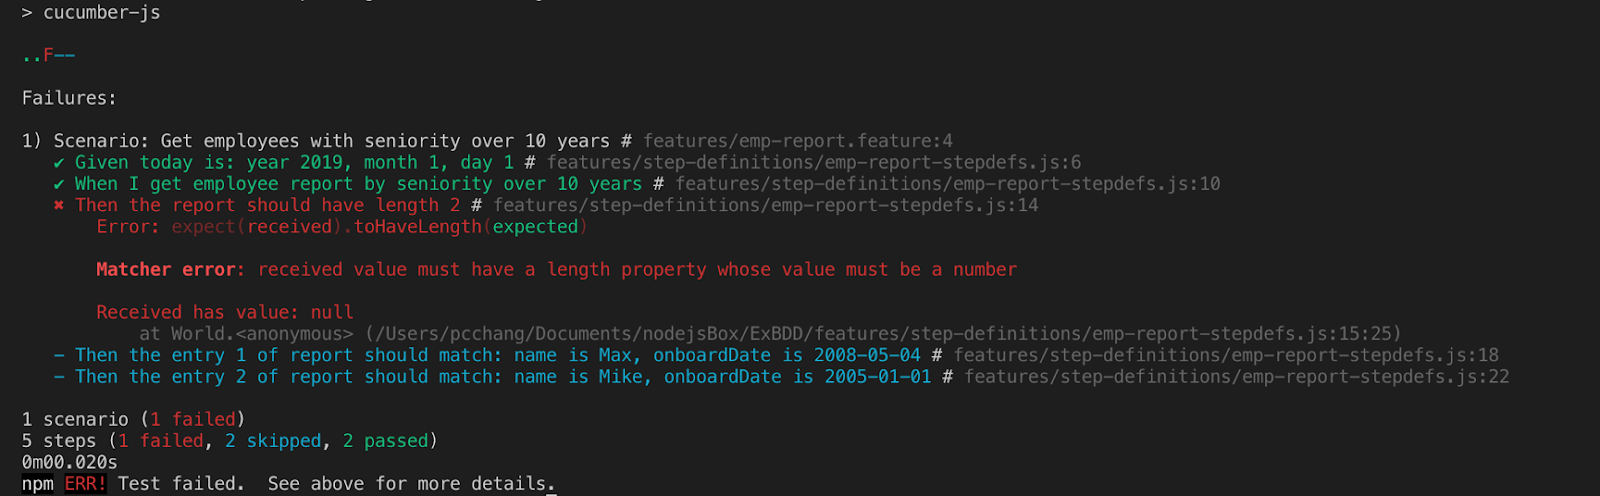
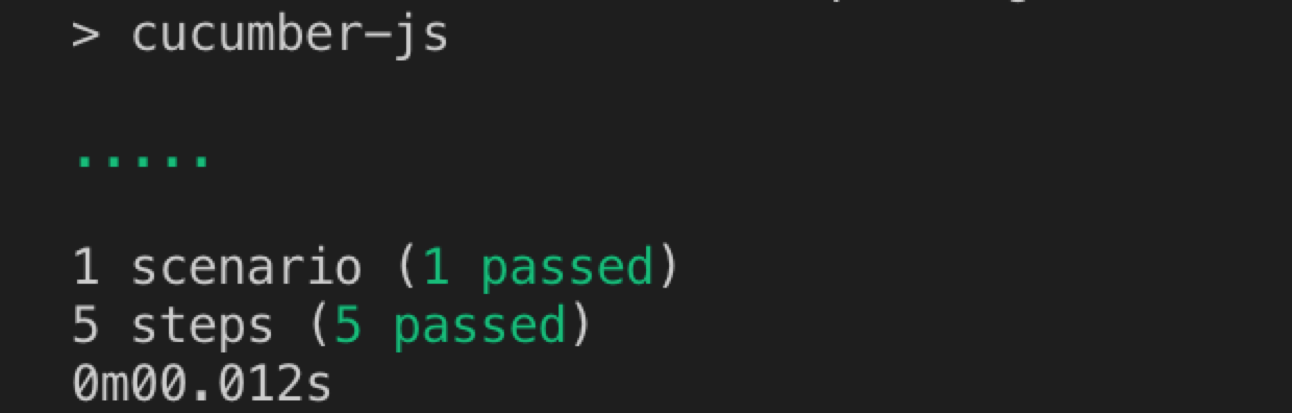
步驟 4:執行紅燈測試
執行以下指令執行測試:
$ npm test
因為還沒實作 API 內容,所以會得到驗證失敗的結果:
步驟 5:實作產品程式
// file: src/main/emp-report.js const getReportBySeniority = ( baseDate , year , isLessThan ) => { baseDate . setFullYear ( baseDate . getFullYear ( ) - year ) ; let reportEmps = employees . filter ( emp => { let obTime = new Date ( emp . onboardDate ) . getTime ( ) ; return isLessThan ? obTime >= baseDate . getTime ( ) : obTime <= baseDate . getTime ( ) ; } ) ; return reportEmps ; }
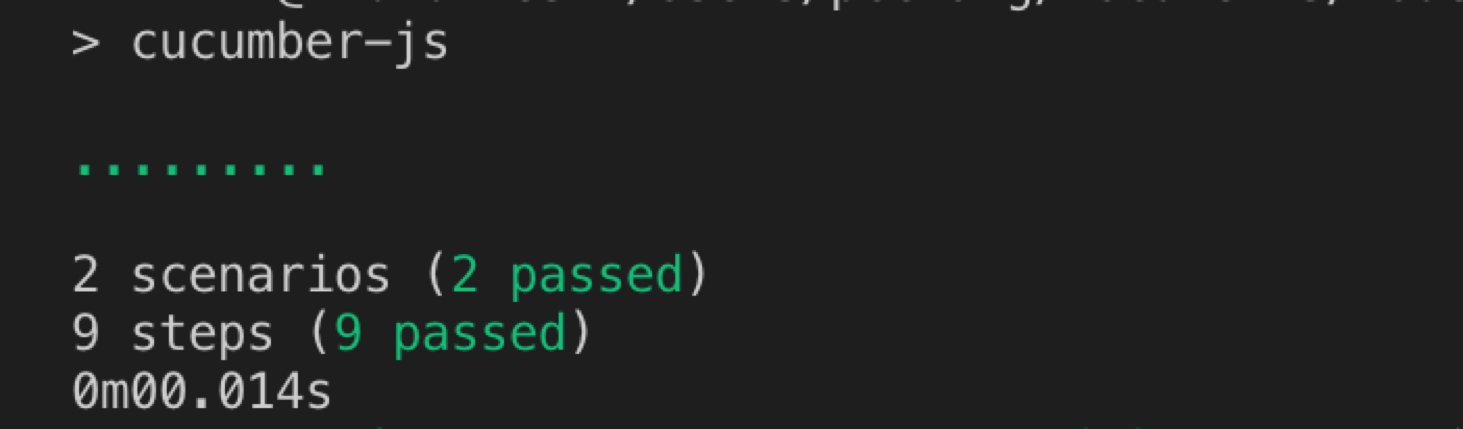
步驟 6:執行綠燈測試
如果產品程式沒有 bug,執行測試應該會得到綠燈。由於沒有任何驗證錯誤,Cucumber 預設直接顯示最後驗證結果。
以目前的例子來說總計有一個 Scenario 和五個 Step 通過驗證:
步驟 7:增加第二個測試情境
我們把另一個測試情境也加上去:
// file: src/test/features/emp-report.feature Scenario : Get employees with seniority less than 5 years Given today is: year 2019, month 1, day 1When I get employee report by seniority less than 5 yearsThen the report should have length 1Then the entry 1 of report should match: name is Sepp, onboardDate is 2018-12-17
因為使用了新的 Step,所以也要定義對應的動作:
// file: src/test/features/step-definitions/emp-report-stepdefs.js When ( 'I get employee report by seniority less than 5 years' , function ( ) { this . result = empReport . getReportBySeniority ( this . baseDate , 5 , true ) ; } ) ; Then ( 'the report should have length 1' , function ( ) { expect ( this . result ) . toHaveLength ( 1 ) ; } ) ; Then ( 'the entry 1 of report should match: name is Sepp, onboardDate is 2018-12-17' , function ( ) { expect ( this . result [ 0 ] ) . toMatchObject ( { name : 'Sepp' , onboardDate : '2018-12-17' } ) ; } ) ;
如果程式實作無誤,應該一樣會看到測試通過:
至此我們就成功地以 BDD 方式完成了「員工報表管理系統」範例。
Cucumber 技巧補充一:增加 Step 定義的重用性 (Reusability)
如果你照著上面示範操作過一遍,應該會注意到一件事,那就是寫了很多重複性高的 Step 定義。
目前 Step 定義的 js 檔應該長這樣:
//file: src/test/features/step-definitions/emp-report-stepdefs.js const { Given, When, Then } = require ( 'cucumber' ) ; const expect = require ( 'expect' ) ; const empReport = require ( '../../../main/emp-report' ) ; Given ( 'today is: year 2019, month 1, day 1' , function ( ) { this . baseDate = new Date ( 2019 , 0 , 1 ) ; } ) ; When ( 'I get employee report by seniority over 10 years' , function ( ) { this . result = empReport . getReportBySeniority ( this . baseDate , 10 , false ) ; } ) ; When ( 'I get employee report by seniority less than 5 years' , function ( ) { this . result = empReport . getReportBySeniority ( this . baseDate , 5 , true ) ; } ) ; Then ( 'the report should have length 1' , function ( ) { expect ( this . result ) . toHaveLength ( 1 ) ; } ) ; Then ( 'the report should have length 2' , function ( ) { expect ( this . result ) . toHaveLength ( 2 ) ; } ) ; Then ( 'the entry 1 of report should match: name is Max, onboardDate is 2008-05-04' , function ( ) { expect ( this . result [ 0 ] ) . toMatchObject ( { name : 'Max' , onboardDate : '2008-05-04' } ) ; } ) ; Then ( 'the entry 2 of report should match: name is Mike, onboardDate is 2005-01-01' , function ( ) { expect ( this . result [ 1 ] ) . toMatchObject ( { name : 'Mike' , onboardDate : '2005-01-01' } ) ; } ) ; Then ( 'the entry 1 of report should match: name is Sepp, onboardDate is 2018-12-17' , function ( ) { expect ( this . result [ 0 ] ) . toMatchObject ( { name : 'Sepp' , onboardDate : '2018-12-17' } ) ; } ) ;
總共定義了 5 個不同的 Then Step,但以實際內涵來說,其實只有 2 種類型的 Then Step 動作,其他都只是細節參數不同而已。
是否能用參數化的方式提高 Step 定義的重用性?
當然可以。在 Step 定義的部分,可以用大括號將我們想參數化的地方標示起來,大括號內註明資料型態 。
例如原本的 5 個 Then Step 可以被精煉為以下 2 個 Then Step:
// file: src/test/features/step-definitions/emp-report-stepdefs.js Then ( 'the report should have length {int}' , function ( length ) { expect ( this . result ) . toHaveLength ( length ) ; } ) ; Then ( 'the entry {int} of report should match: name is {string}, onboardDate is {string}' , function ( index , name , onboardDate ) { expect ( this . result [ index - 1 ] ) . toMatchObject ( { name : name , onboardDate : onboardDate } ) ; } ) ;
由於 `name` 和 `onboardDate` 我們定義為 string 型態,因此 feature 檔內的描述語句也要在對應的地方加上雙引號表示 string 型態:
// file: src/test/features/emp-report.feature Feature : Get Employee Report by Seniority Test the feature of getting report by seniority. Scenario : Get employees with seniority over 10 years Given today is: year 2019, month 1, day 1When I get employee report by seniority over 10 yearsThen the report should have length 2Then the entry 1 of report should match: name is "Max" , onboardDate is "2008-05-04" Then the entry 2 of report should match: name is "Mike" , onboardDate is "2005-01-01" Scenario : Get employees with seniority less than 5 years Given today is: year 2019, month 1, day 1When I get employee report by seniority less than 5 yearsThen the report should have length 1Then the entry 1 of report should match: name is "Sepp" , onboardDate is "2018-12-17"
如此就能減少撰寫太多重複性高的 Step 定義。
事實上 Cucumber 還有很多撰寫技巧有助於提高重用性,例如 Scenario Outline,就留給讀者自行發掘。
Cucumber 技巧補充二:產生精美測試報告
本文開頭展示了一張漂亮的測試結果報告圖片,是如何產生的呢?
Cucumber 有很多 plugin 支援產生不同格式的測試結果報表,例如 JSON、純文字、HTML、PDF 等等。這些 plugin 有些是內建,有些是第三方提供,可以根據自己的需求選用。
步驟 1:安裝 Plugin
$ npm install cucumber-html-reporter --save-dev
步驟 2:新增負責產生報表的 JS 檔
在專案根目錄新增以下檔案:
// file: generate-test-report-html.js const reporter = require ( 'cucumber-html-reporter' ) ; const options = { theme : 'bootstrap' , jsonFile : 'reports/test-report.json' , // JSON 格式的測試結果檔路徑 output : 'reports/test-report.html' , // HTML 報告輸出位置 reportSuiteAsScenarios : true , launchReport : true , metadata : { // 顯示在報告上的附屬資訊 "Test Environment" : "DEVELOPMENT" } } ; reporter . generate ( options ) ;
步驟 3:修改 package.json 的 script
增加一個 script `test-report-html`,在執行測試測試後會繼續產生 HTML 報表:
…. " scripts" " test" " cucumber-js src/test/features" " test-report-html" : " cucumber-js src/test/features -f json:reports/test-report.json; node generate-test-report-html.js" }, …..
步驟 4:執行測試
執行以下語法:
$ npm run test-report-html
就會在測試執行完後產生報表,並且自動開啟瀏覽器展示測試報告:
結語
連續兩篇文章簡單介紹了 TDD 和 BDD 的觀念,並用同一個範例貫穿實戰,示範了傳統開發模式、TDD 方式、BDD 方式分別如何開發。希望透過這樣實際操作和比較,有助於增加對 TDD、BDD 開發方式的了解。
快速回顧 TDD 和 BDD 的重點:
TDD:
先寫測試再開發。
依循「紅燈/綠燈/重構」循環(Red/Green/Refactor)。
在初期就確保測試程式的撰寫,而且容易在初期定義出更貼近使用方的介面。
BDD 基於 TDD 的基礎更進一步:
在寫測試前先寫測試規格書。
使用更接近人類語意的方式來描述測試情境。
這份規格書是一份「可以被執行的規格」,可以被轉成自動化測試,甚至產生報表。
測試寫越多越好?
測試是為了幫助專案確保系統品質,長遠來說自動化測試可以幫助工程師省下很多重複性的測試人力。但不可諱言,撰寫測試確實會瓜分工程師的精神和時間,尤其在專案時程和人力有限的情況下,如何取捨權衡測試覆蓋率、開發優先順序,是開發團隊的一大課題。我覺得這篇文章「
過高的 Test Code Coverage 將摧毀一個新專案 」能提供一些反思的觀點。
如同前一篇文章文末提到,專案開發永遠是一個權衡 (trade-off) 的過程,無論是任何工具或開發流程,目標都是為了「讓產品順利上線」,如果為了過度追求工具或流程的標準而花費過多精力,忽略現實性的資源限制,反而捨本逐末。不同專案有不同的時空環境和限制,沒有一定標準,開發團隊間應該有充分的討論和共識。


留言
張貼留言